In this guide, we will delve into the fascinating process of creating hollow chocolate molds.
Making hollow chocolate molds is a delightful process that combines culinary skills with a touch of creativity. This article will guide you through the simple steps necessary to create your own hollow chocolate molds at home.
From selecting the right type of chocolate to understanding the process of tempering and finally molding the chocolate, every detail is covered. Stick around to learn the nuances of this process and soon, you’ll be creating beautifully crafted hollow chocolate molds that are perfect for any occasion.
Key takeaways:
- Choose the right type of chocolate for molding.
- Understand the different types of chocolate suitable for melting.
- Gather all the necessary ingredients and equipment.
- Learn how to melt chocolate using a double boiler, microwave, or melting pot.
- Follow the steps to create hollow chocolate molds and properly cool and unmold them.
Inside
Choosing the Right Chocolate for Molding
Choosing the appropriate chocolate is the first key step in creating perfect chocolate molds. Couverture chocolate is often recommended due to its high cocoa butter content. This type ensures that the chocolate molds will have a shiny finish and a satisfying snap when broken or bitten.
For a more budget-friendly option, compound chocolate can be used. This type is easier to work with as it does not require tempering unlike couverture. However, the trade-off is a less shiny finish and a different mouthfeel.
White, dark, or milk chocolate can be chosen based on personal preference or the recipe requirements. Dark chocolate has the highest cocoa content, delivering a bitter taste and richer color. Milk chocolate offers a sweeter and creamier flavor while white chocolate is the sweetest among the three with a delicate cocoa butter flavor.
Always ensure that the chocolate is fresh, high-quality, and stored at room temperature, as old or improperly stored chocolate can affect the end result. Also, inspect the ingredient list on the chocolate packaging. Avoid those with excessive additives, oils, or artificial flavors as these can interfere with the molding process.
Lastly, consider the shape and detail level of the mold when choosing the chocolate. For molds with intricate details, a chocolate with a higher level of fluidity when melted is ideal. This will ensure that the chocolate can reach and settle into all parts of the mold for a more detailed finished product.
Understanding the Types of Chocolate Suitable for Melting
Coverture Chocolate is renowned for its high-quality cocoa and smooth melting properties, making it a superior choice for molding. Its richness creates a palate-pleasing flavor and the cocoa butter content gives it a satisfying snap once hardened.
Compound Chocolate, on the other hand, uses vegetable fat in place of cocoa butter. This choice has a lower price point, offers a simpler melting process, and doesn’t require tempering, making it a popular option for beginner chocolatiers.
Bittersweet Chocolate, a high-intensity dark chocolate variety, brings a depth of flavor to molds. Remember, its lower sugar content means that it doesn’t sweeten as much as other varieties.
Milk Chocolate offers a sweet, creamy taste, and its smooth texture makes it another good option for molding. However, melting milk chocolate needs special patience as it scorch easily.
Semisweet Chocolate, a universally loved type, balances sweetness and cocoa intensity. A good semisweet chocolate typically melts consistently and smoothly.
White Chocolate presents a different profile altogether. It lacks cocoa solids and relies entirely on cocoa butter, sugar, and milk solids for its creamy flavor. Note that it can be tricky to melt due to its higher sugar content.
Each of these chocolate types present unique flavor profiles, melting temperatures, and consistencies. Experimenting with each can yield different results, blending them can also produce a customized taste profile. Always chop the chocolate pieces consistently before melting to ensure even heat distribution.
Preparation of Ingredients for Hollow Chocolate Molds
Before starting the molding process, ensure all your ingredients are in place.
High-quality chocolate is key and can be dark, milk or white depending on your personal preference. Pure chocolate preferable as it produces shinier, snappier results.
Also required is a heat source for melting the chocolate. This can be a stovetop with a double boiler, a microwave, or a chocolate melting pot.
Accurate food-safe chocolate molds are essential. They can be found online or at a local baking supply store.
Additionally, you’ll need a thermometer to control the melting temperature, the suitable cooking tool for stirring chocolate, as well as a cooling rack for setting the molds.
When selecting molds, there are many designs to choose from, including eggs for Easter, characters for birthdays or charming hearts for Valentine’s day.
Ensure the molds are dry and clean. Any debris or drop of water can spoil the chocolate, as it might seize or become grainy.
Remember to prepare your work area. Clear countertop space, have greaseproof paper or silicone baking mats to put the molds after filling. If the chocolate spills, it’ll be easier to clean up.
Lastly, chill a pan or baking sheet in the fridge. This will speed the cooling process once the molds are filled with chocolate.
Plan for enough resting time. Once formed, the chocolate molds should rest without disturbance for a few hours, or overnight ideally to ensure they set properly.
Melting Chocolate in a Double Boiler Explained
A double boiler melting process leverages the element of gentle heat which chocolates require for efficient melting. This method involves using two pots – one filled with water and another smaller one carrying the chocolate to be melted.
When selecting your pots, ensure the smaller one can fit into the larger without fully submerging, the base should not touch the boiling water. The heat from the rising steam will promote slow melting of the chocolate.
Begin by pouring water into the larger pot, keeping it halfway filled. Place your chocolate pieces into the smaller pot. Take note to chop up bars or blocks of chocolate into evenly sized chunks to ensure a uniform melting process.
Heat the water to a boil, then lower the heat to keep the water at a simmer. Sit the smaller pot into the larger one, and keep stirring the chocolate until it melts completely. Remember to turn off the heat once you attain a completely melted, smooth consistency to prevent overheating and consequent burning of your chocolate.
Be mindful to avoid even a splash of water into the chocolate. Water can cause the chocolate to seize, transforming it into a grainy, stiff mess which may be unsalvageable. Using dry utensils to stir is thus integral.
This double boiling method provides control over the chocolate melting process, preventing quick overheating while ensuring a smooth and glossy finish. In practice, the technique presents a rewarding balance of chocolate’s texture and flavor, setting the stage for proceeding with your hollow chocolate molds.
Microwave Method of Melting Chocolate
Begin with small pieces of chocolate to ensure even heating; larger chunks might melt unevenly, causing the outer layer to burn while the interior remains solid. Place the chocolate in a microwave-safe bowl and heat it in thirty-second intervals. After each interval, remove the bowl and stir the chocolate to assist in the melting process and avoid overheating. Ignore the temptation to increase the duration of heating; patience is crucial for this process.
The chocolate may retain its shape until stirred, so frequent stirring is necessary to check on its consistency. Continue till all the chocolate has melted, maintaining a smooth, glossy texture. For a more even melt, consider adding a tiny amount of room temperature butter or oil. Be sure there are no water droplets in or around the bowl – water can seize up the chocolate, making it unusable. After this, your chocolate is ready for molding.
Instructions for Using a Melting Pot to Melt Chocolate
Select a chocolate melting pot specifically designed for this purpose, as it provides even and consistent heat, preventing the chocolate from scorching. Use chopped chocolate or chocolate chips to ensure quick and uniform melting.
Begin by cleaning the melting pot to remove any residual oils or particles that might affect the texture and taste of the chocolate.
Place the chocolate into the melting pot and set the temperature as per the pot’s instruction manual. Resist the temptation to raise the heat to speed up the process—chocolate is delicate and can burn easily.
Stir the chocolate occasionally with a clean, dry spoon or spatula to encourage even melting. Avoid introducing water or steam into the pot as it can cause the chocolate to seize up and become grainy.
Once all the chocolate is melted and smooth, you are ready to apply it to the mold. The melted chocolate can be poured directly into the mold or spooned in, depending on the design and complexity of the mold.
Remember to carefully track the temperature throughout this process and adjust the heat as needed to keep the chocolate in liquid form while working with it—avoid letting it cool and solidify before it’s in the mold.
Handle your molds with care, considering they are filled with hot, melted chocolate. Safety should be a priority when managing hot kitchen appliances.
Once the molds are filled, they are ready for the next step: creating the hollow effect, which involves rotating and cooling in a specific manner to be discussed later.
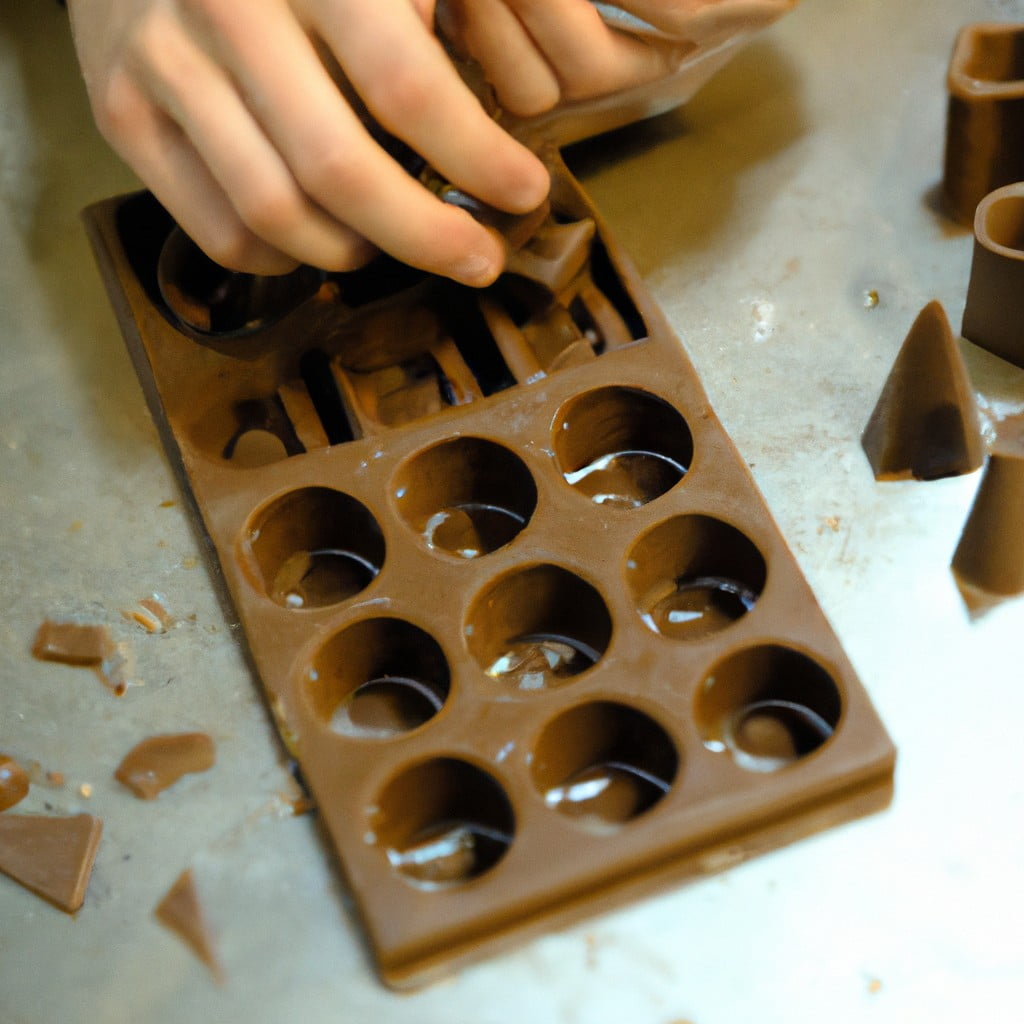
Steps to Creating Hollow Chocolate Molds
After melting your chocolate using your preferred method, set out your mold on a flat surface within easy reach. Using a spoon or a chocolate ladle, fill the mold until it is completely full. Once filled, gently shake the mold to eliminate any air bubbles and ensure uniform consistency.
Next, turn the mold upside down, allowing the excess chocolate to drain out onto a piece of parchment paper, thus creating a hollow interior. The thickness of the shell depends on the time you let the chocolate drain – the shorter the time, the thinner the shell.
Upon reaching your desired thickness, scrape off any excess chocolate around the edges of the mold using a palette knife or spatula, then allow it to set slightly at room temperature for about 15 minutes.
Transfer the slightly set mold to the refrigerator, place it flat for further setting. Keep it to chill until it appears to have separated from the mold. This process takes about 15-20 minutes.
Repeat the process until you have made as many hollow chocolate molds as needed. Be sure to keep the chocolate molds separate to prevent them from sticking together.
Remember, if the chocolate gets too solid while you’re working, you can always gently reheat it to a workable consistency. The goal is to create hollow molds that are sturdy yet pleasantly thin.
Keep this in mind, using a mold with a smooth interior surface will make the unmolding process easier and result in a shinier finished product. Lastly, do not hurry the cooling or setting process – patience is key in achieving perfect hollow chocolate molds.
Cooling and Unmolding Process for Hollow Chocolate Molds
After the melted chocolate is poured into the molds, it’s crucial to ensure proper cooling for the formation of the desired shape and sturdy structure. First, let the chocolate-filled molds rest at room temperature. This initial cooling is needed before placing them in a refrigerator, which allows the chocolate to slowly contract and prevents cracking.
Once the chocolate has somewhat solidified, move them to the refrigerator. This rapid cooling stage lasts for about 15 to 20 minutes. Do keep an eye on them to prevent excess moisture buildup.
For proper unmolding, gently tap the mold on the counter to loosen up the formed chocolate. If it doesn’t come out, it means it needs more chilling time. Resisting the urge to force the chocolate out of the mold is critically important – the reward of a perfectly formed hollow chocolate mold is worth the patience.
Keep your hands cold while handling the molds. Room temperature or warm hands might melt the outer surface, marring the finish of the finished product. Remember to touch the chocolate as little as possible to preserve its shine and texture.
Finally, ensure that the unmolded chocolates are stored carefully, ready for use or enjoyment later. Proper storage involves a cool, dry place with a stable temperature. Avoid sunlight or warm rooms that could potentially melt the chocolate. This maintains the quality and prolongs the shelf-life of the chocolates.
Packing and Preservation of Hollow Chocolate Molds
To maintain your hollow chocolate molds’ quality, packing and preservation are essential acts. First, consider protective packaging. Wrapping the molds in a clear cellophane bag can protect them from dust and air. Additionally, storing them in a dark room at about 60–65°F (15-18°C) provides an ideal climate, protecting your chocolate from melting or acquiring a whitish bloom due to changes in temperature.
The use of sturdy boxes for packaging can offer additional protection while transporting, ensuring the delicate hollow molds remain intact. If your molds are for sales or as a gift, embellish the boxes with ribbons for an elegant touch.
When preserving for long periods, vacuum sealing the chocolate molds can effectively increase their shelf life. It eliminates air that accelerates degradation, keeping the chocolate fresh. Remember, despite these preservation efforts, it’s ideal to consume your product while at its peak – typically within a few weeks to enjoy its full flavor and quality.
FAQ
How do you melt chocolate for hollow molds?
To melt chocolate for hollow molds, utilize a double boiler or a melting pot, alternatively use a microwave, heating in 30-second bursts, then incorporate coconut oil with vigorous stirring, and finally spoon the molten chocolate into the mold.
What type of chocolate is best suited for creating hollow molds?
Couverture chocolate, with its high percentage of cocoa butter, is the most suited for creating hollow molds due to its great fluidity when melted.
What is the ideal temperature to maintain while melting chocolate for hollow molds?
The ideal temperature to maintain while melting chocolate for hollow molds is between 105°F to 115°F (40°C to 46°C).
Can you use a microwave for melting chocolate and if yes, how should it be done properly?
Yes, chocolate can be melted in a microwave by breaking it into small, even pieces, placing it in a microwave-safe bowl, and heating it in short intervals, stirring between each, until smooth.
Here's Something More
 Mouth-Watering Chocolate Sourdough Recipe: A Baker’s Dream
 Decadent Chocolate Pizza: Your Sweet Tooth’s Best Friend
 Perfect Chocolate Bonbon Recipe: Impress With Homemade Delights
 Ultimate Chocolate Biscuit Recipe for Sweet Cravings
 Elevate Your Treat Game: Chocolate Chip Shortbread Recipe